Recycled Paper Pulp Pots
Garden DIY
Plastic Pots in the Garden
Plastic pots are the classic garden go-to. They are cheap and do a great job at holding soil as any good pot should. However, most plastic pots are used only one time before being thrown away. It can be very difficult to find recycling centers that take them. Even if you choose to reuse them, they often breakdown after only a couple of years due to sun exposure. Reusing plastic pots can also spread disease and other pathogens if not cleaned properly.

Alternatives to Plastic
There are alternatives to plastic pots. Paper pulp pots and manure pots are great biodegradable pot options. There are also coconut fiber pots. I recommend avoiding peat pots unless the peat is sourced sustainably. Peat product can be a unsustainable product and has resulted in the depletion of peatlands and bogs. I will go into more detail on peat use in a later post.

Paper Pulp Pots
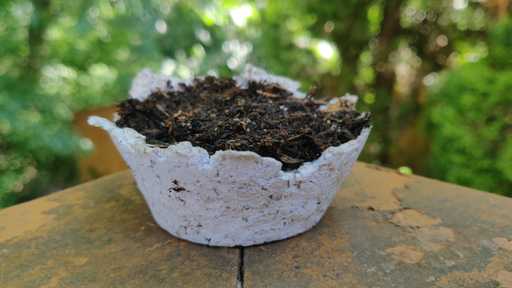
I wanted to show how to make a paper pulp pot at home. While these pots will not last forever as they are designed to break down over time. However, they can be a great alternative for starting seeds and growing plants to a particular size before placing in the ground. To make these pots all you need is shredded paper (newspaper, old bills, etc.), water, and flour. You will also need a bowl, blender and some sort of sieve such as cheese cloth or a mesh. Avoid using any paper that is glossy or coated with plastic as this will not degrade and will leave plastic in your soil.
Paper Pot Recipe
Ingredients
- 6 cups Shredded paper
- 1/3 c flour
- Water
Directions
- Shred or tear your paper into strips or small pieces.
- In a bowl, cover the paper with water and let sit for 5-10 minutes.
- Place the wet paper shreds into a blender and fill the blender with cold water. The water should fill the blender 3/4 of the way. Its better to use too much water than not enough.
- Blend the paper until it is soft and pliable.
- Add 1/3 cup of flour and mix into mixture.
- Pour the paper into a mesh strainer or cheese cloth. Squeeze extra water out of the paper mixture until you are left with pulp. Run paper mix through a fine mesh strainer and squeeze out extra water to form a pulp.
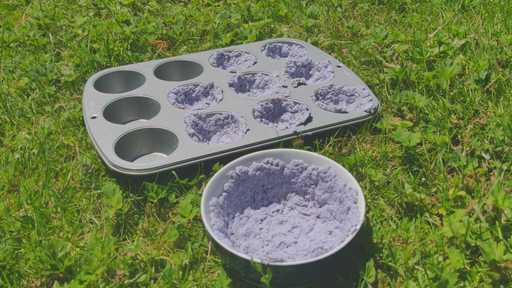
- Form the paper pulp into desired shapes and sizes. I used muffin tins as a base for seed starters. You can also use bowls to help form larger pots. Try to keep the sides and bottom even in thickness.
- Place the formed paper pots in a warm dry spot for 24-48 hours. If the pots do not dry by this time then it means they might be them too thick, this can lead to mold development.
- When they are dry you can take them out of the forms.
- Plant some seeds!
If you decide to make some paper pulp pots I would love to see them. Tag #floraforfana on Instagram to show off your paper pulp pots.
